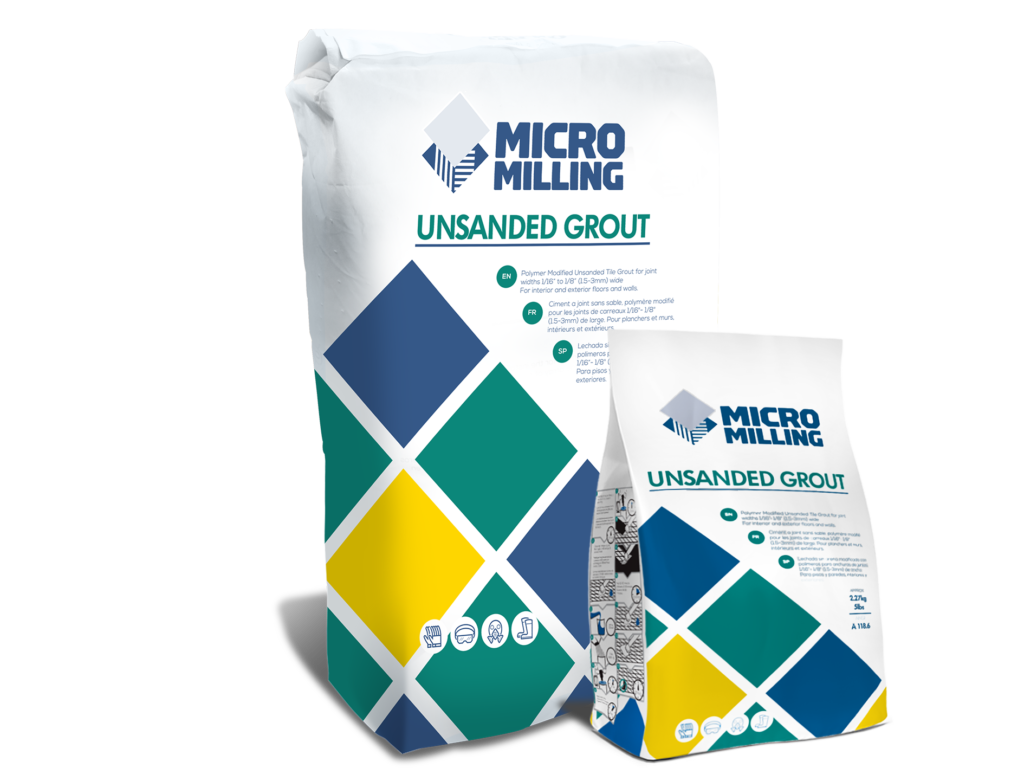
UNSanded Grout
Micro Milling Polymer Modified Unsanded Grout is a factory-prepared mixture of Portland cement, calcium carbonate, and special additives to which only water is added.
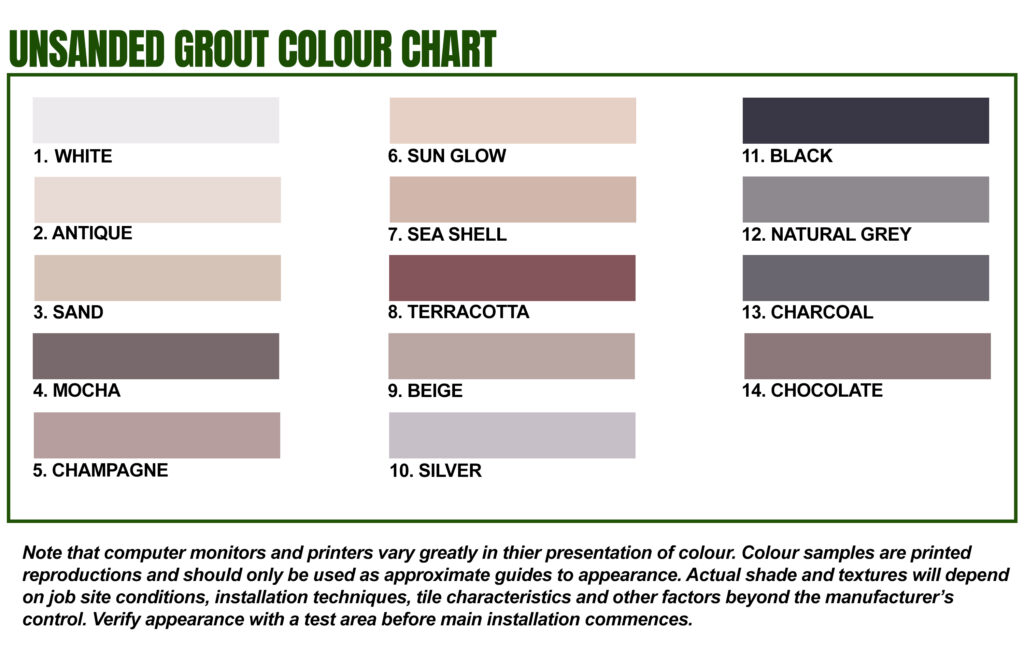
- Available in 14 colours
- Available in 25lb. and 5lb. bags
- For grout joints 1/16”- ⅛” (1.5- 3mm) wide
- Water beading formula helps repel most stains, dirt and grime
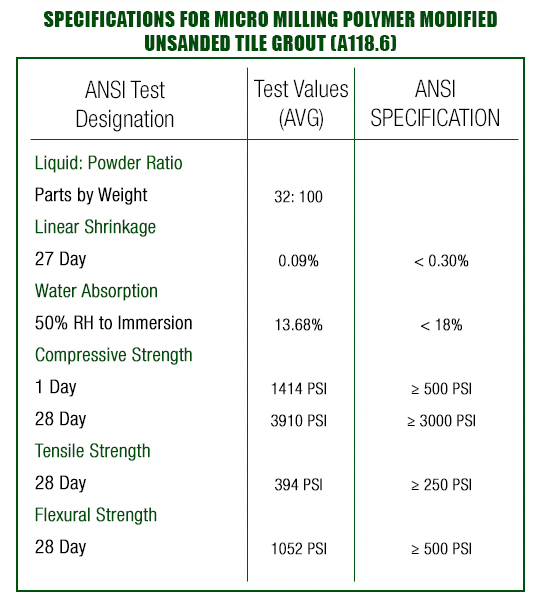
- Exceeds ANSI A118.6 for Standard Cement Grouts for Tile Installation
- Polymer Modified- Just add water
- Interior and Exterior floors and walls
- Commercial or Residential Installations
- Suitable for grouting the following tile types- ceramic, porcelain, cement, glass, marble, mosaics and natural stone
FEATURES
- For grout joints 1/16”- ⅛” (1.5- 3mm) wide.
- Water beading formula helps repel most stains, dirt and grime.
- Exceeds ANSI A118.6
- Polymer Modified- Just Add Water
- Available in 14 colors.
LIMITATIONS
Actual shades may vary from color charts as they depend on job site conditions, installation techniques, cleaning methods, tile characteristics, and other factors beyond the manufacturer’s control. Wait for one week after grouting to ensure the grout has cured properly before applying any sort of cleaning agent or excessive water, otherwise discoloration may occur.
Efflorescence is a mineral deposit that sometimes leaches or migrates to the surface of Portland cement-based grouts.
GROUTING TIPS FROM THE SPECIALISTS
- Before beginning grout work, first decide whether you want the grout work to blend in with the tiles or stand out from the tiles.
- If you want the grout to blend in with the tile, make sure the color of your grout is as close as possible to the color of the grout to stand out from the tile, select colors that contrast with your tile.
- Even if you decide to blend in your grout, pick a color that is a shade different from your tile. This can give you a pleasant design instead of just having one color everywhere.
- When contrasting colors, select colors that complement each other. Additionally, be careful when contrasting colors. If your contrast is too much, you might end up with a checkerboard look.
- It is a good idea to use dark grout on tiles that have a lot of heavy traffic since it hides dirt better.
USES
- Interior and exterior floors and walls
- Commercial or residential installations
- Suitable for grouting the following tile types: ceramic, porcelain, cement, glass and quarry tile, marble and natural stone.
PREPARATION
Surfaces to be tiled should be dry, free of dirt, dust or curing compounds and other loose or weak material that could affect a mechanical bond. Where possible substrates should be hosed or pressure-washed.
Substrates should be even to optimize the coverage of Micro Milling Thin set.
MIXING
Micro Milling Premium 3600 thin set should be added to clean, cool, potable water at the rate of approximately 4.6- 5.0 litres (4.9- 5.3 US Quarts) per 22.68 kg (50 lb.) bag. Mix thoroughly until smooth and let mortar slake for 5 minutes, then remix. If a mechanical mixer is used it must be done at low RPM (300 or less) to avoid entrapping air into the mortar.
Do not add water or additional powder after the slaking period. The proper mortar consistency is such that when applied with a notched trowel to the substrate, the ridges formed in the mortar will not flow or slump. Do not use mortar after initial set in the mixing bucket. During use, remix mortar occasionally.
Please note: Do not use warm water, it will accelerate the drying time of the mortar and could negatively affect the final shear bond strength.
Once Premium 3600 thin set is properly mixed never be tempted to add additional water.
APPLICATION
Apply mortar liberally with the flat side of the trowel using sufficient pressure to work mortar into good contact with the substrate. Use a proper sized notched trowel to ensure 100% coverage of mortar under tiles.
Place tiles while surface is still wet and tacky. Spread only as much mortar as can be covered in 5-10 minutes or before surface dries. Place the tiles firmly into the wet mortar. Push the tiles back and forth in a direction perpendicular to the trowel lines to collapse the mortar ridges and help achieve maximum coverage.
A ¼” gap shall be left around all vertical surfaces to allow for structural movement. Industry standards require approximately 3/32” to ⅛” (2-3mm) mortar bed thickness after tapping in. Follow ANSI A108.5 specifications for installation.
Clean excess mortar from joints so that ⅔ of the tile’s depth is available for grouting, Normal grouting can be done 24 hours after installation.
CURING
Minimum cure is reached in 24 hours. Heavy traffic should be restricted for 7 days. Setting and drying times may vary according to atmospheric conditions.
Clean Up
Clean hands and tools with warm soapy water before materials dry.
EXPANSION AND CONTROL JOINTS
Provide for expansion and control joints as specified per TCNA Detail EJ171.
COVERAGE
Coverage will vary depending on the depth and width of the tile joints. This chart is for estimating how much product is needed for a given tile installation. These figures are based on filling the joints to their full depth with no waste.

STORAGE AND SHELF LIFE
Store in dry conditions, off the ground in well ventilated areas for the best life expectancy- up to one (1) year from the date of manufacture in unopened container
SAFETY INFORMATION
Corrosive. During mixing or application avoid contact with eyes and skin. In case of contact with eyes rinse repeatedly with water and call a physician. Wash thoroughly after handling. May be harmful if swallowed.
Contains free silica. Do not breathe dust. Prolonged/repeated breathing of dust may cause delayed lung injury (silicosis). Follow OSHA safety and health standards for crystalline silica (quartz).
DISCLAIMER
Micro Milling Limited is not responsible for workmanship not in accordance with its instructions and NTCA/ANSI/ISO guidelines.